Monday, February 28, 2011

Dr. Seuss Fabric Restocked!

Hey everyone! I just wanted to drop in to let you all know that the oh-so-popular Dr. Seuss fabrics from Robert Kaufman have been restocked! All of these adorable prints flew off of our shelves the first time around so here's your chance to get some more!


This line is just too cute! It would make an adorable kiddo's room or you could have the Dr. Seuss party of the century! If you need any help with decorating ideas, come on into the shop and talk to one of the Cabbage Rose Girls! We have a whole heap of crafty ladies who can help you plan something magical!


Isn't this Pillowcase Kit the cutest??? Make up this pillowcase, pick out your favorite Dr. Seuss book and some candy and you've got an adorable themed Easter basket in the making!  

What would you like to make with Dr. Seuss???

Friday, February 25, 2011

Sweet Samples!!

Happy Friday! We've got some more super sweet samples to show you to get you inspired for your weekend! Today we've got a few items for the little ones that will have you swooning!


Loving this little boy's playsuit! Those button tab straps are just too cute and I love that puppy print from Fifi & Fido! You can get the pattern for this cutie here!


Isn't this dress precious? It's Ella's Party Dress by Fig Tree & Co. and it's the perfect little pattern for making your darlings some adorable Easter dresses! Check out the line Scarborough Fair for some pretty pastels!  
 

Can you say CUTE??? I'm just in love with the Shoulder Tie Topper! You can make some sweet little sundresses for the Summer and then layer them with long sleeves and leggings like our little model here for the cooler months! This one was made with Central Park by Kate Spain.

Inspired to make your little one some dresses yet??? Well if you are, you should check out our 25% OFF department! We've got lots of super cute lines discounted!

Thursday, February 24, 2011

Apron Samples!

Goodness! The Cabbage Rose Girls are as busy as bees busting out NEW samples for the shop left and right! Today I'm going to share a couple of aprons that have me wanting to create my own!


This little number is Domestic Goddess by Amy Butler! Absolutely in LOVE! I love that they made it with Hideaway by Lauren + Jessi Jung! It gives this chic pattern a fun and kitchsy twist!


Look at the adorable Flouncy Little Apron! Such a cute piece, this apron could nearly pass off as a dress from the front! A girlie girl's dream!


I'm just crazy over those pockets! This one was created with Fifi & Fido by Anna Griffin!

If you're in the area, be sure to come by the shop! There's SO much cuteness happening in their right now! You don't want to miss it! ;)

Monday, February 21, 2011

Make it with Felt!


Hi there ladies! How was your weekend?? Hopefully it was full of fun, relaxation and maybe a crafty project or two! Today I wanted to share an awesome new product we just got in and some inspiring ideas to use it with! XoticFelt is an amazing new line of felts made out of a genius blend of bamboo and rayon! These natural fibers are not only super soft, strong and able to hold the most vivid of colors, they're also a sustainable alternative to synthetics! So if you're trying to make your life a little greener, these felts are a great choice! We have yardage along with easy to use 18" x 20" pre-cut pieces (great for little projects)!


The Cabbage Rose girls whipped up these cute little felt decorations in no time! Since felt doesn't fray all you have to do is cut and stitch! Sew cute!

Sweet Shoppe

The Sweet Shoppe Ornament Set is an adorable pattern that uses felt! I think it would be super cute to use some brighter colors for these ornaments! And you wouldn't even have to wait until Christmas to use them! Try decorating a candy buffet table for a party with these fun creations!


I found a precious FREE tutorial for these Bitty Booties on Heather Bailey's blog! An excellent project for our super-soft felts! If you know someone who's about to have a little one, these shoes would make the sweetest of gifts and are sure to make any mama smile! You can download the template and instructions here! Also, there's a Flickr group specifically for these booties where ladies from all over the globe share pictures of how they customized this pattern, be sure to browse through for some inspiration!

Friday, February 18, 2011

Ballerina Fairies!!!

Happy Friday Everyone! I've got a new fabric line to feature that's just too precious for words! So I got one of our Cabbage Rose models, Kaitlyn to strike a few poses in an adorable outfit made with Ballerina Fairies by Ingrid Slyder!


Her mom, Jenny made the ever-so-adorable Girly Skirt in the ballet slippers print! It's the perfect little number to twirl in to her heart's content! Easy to make, fun to wear, and you can finish it in about an hour!


I just love the striped hem and waistband! Such a cute touch! There are lots of great coordinating fabrics in this collection from stripes to paisleys, little florals to little fairies. So whimsical!

Pillowcase Kit - Ballet Slippers Blue  Pillowcase Kit - Ballet Slippers Pink

Here are some cute Pillowcase Kits we just made out of these pretty prints! Whip up the blue or pink pillowcase in 15 minutes and stuff it into your tiny dancer's Easter basket!


She's not just a pretty face, she doubles as a quality control officer! Making sure all the bolts look ship-shape! ;)

Have a great creative weekend!

Wednesday, February 16, 2011

Scenes from the Shop!

Hey hey everyone! I hope you all had a très romantique Valentine's Day! I just wanted to stop in to show you all what some of the Cabbage Rose girls are creating these days! Prepare to be inspired!
 

Susanna created this ADORABLE apron from the Mother & Daughter Aprons book by Cindy Oates! I love that she used Sunkissed! Such a perfect collection for brightening up any project!


Susanna and Jenny combined their creative forces to create these adorable bulletin boards for our office! All you need is a regular cork bulletin board, your favorite fabric (they used Sugar Pop), staples and embellishments! The girls used some of our awesome ric rac, crotcheted flowers from Riley Blake and super cute buttons to really spiff them up! These would be a great item to make if you're decorating a teen bedroom or a craft room!


Pam created this super sweet tea towel by simply sewing a few strips pretty fabric (she used Wildflowers IV) to the end of toweling that you can purchase at our shop! This is a great project to whip up a quick hostess gift or you could make it a little more personal with some embroidery and make it a wonderful Mother's Day present!

I hope you've been inspired to create something beautiful with some of the great new Spring fabric lines! The designs are SO fabulous this season, so scoop up some new prints and get crafty!

Thursday, February 10, 2011

Sugar Overload!

The Moda Bake Shop blog has SO many adorable Valentine's Day tutorials! If you're planning a Valentine's party or if you just want to get into the spirit of this lovely holiday, here are some awesome projects to make this February 14th a little sweeter!


Cover your candies in these super sweet Candy Wrappers!


Put your treats in these adorable Pennie Pockets! {pssst! get yo-yo makers here!}


Dress your little darling in the Valentine's Bubble Skirt!
  

Make a quilt full of Hugs & Kisses!


Show your love on a wall, across a window or over your bed with the LOVE Bunting!


Valentine's is right around the corner so tell your hubbies that what you'd really LOVE is a Cabbage Rose Gift Certificate! Or get one for your Valentine! They're sure to bring a smile to any fabric lover's face!

Wednesday, February 9, 2011

More Cuteness for Valentine's

Hey there ladies! I've got another sweet little tutorial to feature, perfect for Valentine's Day decor!


I found this Shot Through the Heart Arrow Garland on Rachel Denbow's blog, Smile and Wave! For this project, all you will need is some fun fabric, stuffing and scissors! Whip these up quick on your sewing machine or if you don't have one, this is a simple project for hand sewing. 


You can get Rachel's arrow template and her fantastic instructions here!


Isn't this the cutest idea ever??? I think it would be really cute to add some heart shaped plushies to go between the arrows! You can do that by drawing a heart on a piece of paper and cutting it out like you did with arrow template and then constructing it the exact same way!

**We're having a one day SALE! Now through midnight take 20% OFF ALL SPECIAL CUTS**

Tuesday, February 8, 2011

A {Early} Valentine's Day Present!


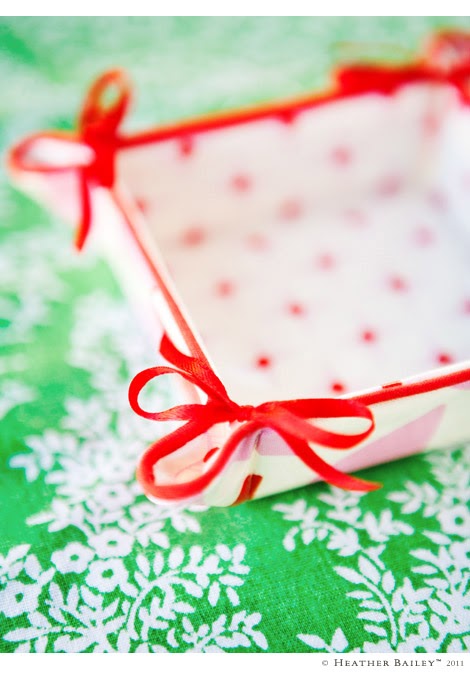
 I was on the HellomynameisHeather blog today and saw this adorable free pattern that I had to share! Consider it an early Valentine's gift from Heather Bailey! 
"Here's a sweet little project that goes together quickly -- a bow-tied box for treats or trinkets.  Perfect for displaying tasty truffles and candies for your Valentine or hip paperclips and doo-dads for your desk.  The pattern and instructions below are for one 3" x 3" x 1 1/4" tray.  However, once you have the hang of it, you can scale the design up or down as needed. Imagine tasty trays for sewing supplies, post-it notes, business cards, candies, jewelry, buttons, keys, coasters..."


MATERIALS LIST 
(for one 3" x 3" x 1 1/4" tray) 
7” x 7” fabric* (use a Layer Cake!)
7” x 7” lining fabric* 
3/4 yd narrow piping 
1 1/3 yd ribbon, 1/8” wide 
8” x 10” stiff, thin cardboard 
Thread 


HELPFUL TOOLS 
Pins, scissors, needle, liquid seam sealant (such a s Fray Check™)
* Suitable fabrics include laminated cotton, quilting-weight cotton, light-weight decorator fabric, and other light to medium-weight woven fabrics like Heather's gorgeous line Nicey Jane!


INSTRUCTIONS 
A. Cut Out Fabric & CardboardClick here to download pattern pieces. Using pattern, cut one 5 7/8” square of fabric and one 5 7/8” square of lining fabric. Round corners per pattern & clip at circles to mark ribbon placement. Of cardboard, cut one 3” square, and cut four 1” x 3” rectangles.  If cardboard is flimsy, cut two sets & glue corresponding pieces together to stiffen.

Tray_01_02_03b B. Baste Piping to Tray Exterior – Baste piping to tray exterior. Or use Glue-Baste-It! Join piping at one black circle by overlapping piping neatly. Trim.

C. Attach Ribbon Ties – Cut eight pieces of ribbon, each 6” long. With a small stitch-length, sew one ribbon to tray at each black circle, on top of piping; stitch back & forth across ribbon to secure well.

D. Sew Lining to Exterior – With right-sides-together, pin lining to exterior. Sew around tray, leaving one side open between black circles. Notch curve at each corner. Turn tray right-side-out through opening in seam.

E. Insert Cardboard & Stitch Around Sides – Insert one rectangular cardboard piece into tray;  butt cardboard up to stitching at side of tray opposite from opening, beneath the seam allowance on exterior side of tray. Secure cardboard in place by stitching 1 1/8” away from fabric edge (not piping edge) along stitching line shown on tray pattern, beginning & ending at black circles. See illustration. Be sure stitching runs alongside cardboard & does not go through it & ribbons are not caught in seam. Insert another cardboard rectangle at one adjacent side & stitch as before. Repeat at opposite side of tray. Slide cardboard square into place at center of tray & stitch along last stitching line, parallel to opening. Insert last cardboard rectangle into opening. Fold tray lining edge under 1/4” & ladder-stitch to close opening in seam.


F. Tie Corner Bows & Trim – Fold sides up & hold corners together with a pin. Tie two ribbons at each corner into a bow. Once tied, trim ribbons to desired lengths. Finish ribbon ends with liquid seam sealant to prevent fraying.

Monday, February 7, 2011

Moda Pillow Talk Blog Hop!!


When: February 1st-20th
What:  Moda Pillow Talk! A fun blog hop with the MODA designers
The Moda Designers were asked to create a pillow that described their creative journey and they will share these on their blogs along with a fun Q&A and GIVEAWAYS!!!
Where: Here are the blogs in the order that they will appear each day through February 20th. Be sure to visit them all!!

February 1st … Aneela Hoey
February 2nd … Blackbird Designs
February 3rd … Brannock and Patek
February 4th … Bunny Hill
February 5th … Cotton Way
February 6th … Fig Tree
February 7th … Kansas Troubles
February 8th … Kate Spain
February 9th … Kathy Schmitz Studios
February 10th … Thimbleblossoms
February 11th … Me and My Sister Designs
February 12th … Minick & Simpson
February 13th … Oliver + S
February 14th … Pieces From My Heart
February 15th … Laurie & Jessi Jung
February 16th … Sweetwater
February 18th … Deb Strain
February 19th … American Jane
February 20th … Primitive Gatherings